EDA in Individual Mode
The Exploratory Data Analysis (EDA) feature for horizontal federated learning (HFL) enables you to access summary statistics about a group of datasets without needing access to the data itself. This allows you to get a basic understanding of the dataset when you don’t have access to the data or you are not allowed to do any computations on the data.
EDA is an important pre-step for federated modelling and a simple form of federated analytics. The feature has a built in differential privacy setting. Differential privacy (DP) is dynamically added to each histogram that is generated for each feature in a participating dataset. The added privacy protection causes slight noise in the end result.
The core API module that contains the EDA-specific functionality is integrate_ai_sdk.api.eda. This module includes a core object called EdaResults, which contains the results of an EDA session.
If you are comfortable working with the integrate.ai SDK and API, see the API Documentation for details.
This tutorial assumes that you have correctly configured your environment for working with integrate.ai, as described in Using integrate.ai.
Steps to run a EDA Individual session
Specify data configuration: specify an
eda_data_configdictionary indicating the client name and columns/features to be explored in the EDA individual session.Create and start EDA session: launch an EDA session with the specified data configuration. Specify the session parameter
eda_mode="individual"to enable individual mode. The EDAsession_idcan be used to track the session status in UI, and it can also be used to load a completed EDA session to review the results at a later time.Create a task group: add one task for each client joining the session.
Dataset information
Specify the datasets to be used in the evaluation. These datasets must be registered in your workspace before they can be used in the notebook. Information about registering datasets is available here for AWS and here for Azure.
consumer_train_name = 'demo_carrier_train'
Set up the task builder
A task builder is an object that manages the individual tasks or clients that are involved in a session. This is generally boilerplate code - you only need to specify the task builder name. For example: iai_tb_aws_consumer.
from integrate_ai_sdk.taskgroup.taskbuilder.integrate_ai import IntegrateAiTaskBuilder
from integrate_ai_sdk.taskgroup.base import SessionTaskGroup

iai_tb_aws_consumer = IntegrateAiTaskBuilder(client=client,task_runner_id="")
Note: you do not need to specify the task runner name, but the variable name is required. This variable will be removed in an upcoming release.
Configure an EDA Session
Step 1: Specify the data config dictionary
Here we recommend running EDA on the raw features for better understanding of the data characteristics.
consumer_features_sub = ['num_floor_norm', 'building_age_norm', 'flood_zone']

eda_data_config = {consumer_train_name: consumer_features_sub}
The eda_data_config file is a configuration file that maps the name of one or more datasets to the columns to be pulled. Dataset names and column names are specified as key-value pairs in the file.
For each pair, the keys are dataset names that are expected for the EDA analysis. The values are a list of corresponding columns. The list of columns can be specified as column names (strings), column indices (integers), or a blank list to retrieve all columns from that particular dataset.
If a dataset name is not included in the configuration file, all columns from that dataset are used by default.
For example:
To retrieve all columns for a submitted dataset named dataset_one:
eda_data_config = {"dataset_one": []}
To retrieve the first column and the column x2 for a submitted dataset named dataset_one:
eda_data_config = {"dataset_one": [1,"x2"]}
To retrieve the first column and the column x2 for a submitted dataset named dataset_one and all columns in a dataset named dataset_two:
eda_data_config = {"dataset_one": [1,"x2"],"dataset_two": []}
Create the EDA session
Step 2: Create and start the EDA session. You can edit the name or description of the session.
eda_individual_session = client.create_eda_session(
    name="EDA individual session",
    description="I am running an EDA individual session",
    data_config=eda_data_config,
    eda_mode="individual",               #Generates histograms on single nodes
    single_client_2d_pairs = None      #Optional - only required to generate 2d histograms
).start()
Note: The name of the session does not need to include individual. It is used here to differentiate between session types. You could specify simply eda_session.
Session parameters
eda_mode= One of {‘individual’,’intersect’}. Defaults to ‘individual’.single_client_2d_pairs(Dict, optional): a data_config like dict with the column names to use to generate 2d-histograms when both columns belong to same dataset. This option only considers the single node 2d-histograms and is valid for both ‘intersect’ and ‘individual’ mode. Defaults to None which means that no local 2d-histogram is generated.
Unlike other sessions, you do not need to specify a model_config file for EDA. This is because there are no editable model parameters.
Since the num_datasets argument is not provided to client.create_eda_session(), the number of datasets is inferred as two from the eda_data_config.
For more information, see the create_eda_session() definition in the API documentation.
Create the task group and start the EDA session
Step 3: Create a task group. Set the task builder name (e.g. iai_tb_aws_provider) and the dataset name (e.g. provider_raw_data).
task_group = (
    SessionTaskGroup(eda_individual_session)
    .add_task(iai_tb_aws_consumer.eda(dataset_name=consumer_train_name))
)

task_group_context = task_group.start()
Wait for the session to complete. You can view the session status on the Sessions page in your workspace, or by polling the SDK for session status.
Analyze the EDA results
The results object is a dataset collection comprised of multiple datasets that can be retrieved by name. Each dataset is comprised of columns that can be retrieved by either column name or by index.
You can perform the same base analysis functions at the collection, dataset, or column level.
results = eda_individual_session.results()
consumer_individual_eda = results[consumer_train_name]

consumer_individual_eda.describe()
*Example output:
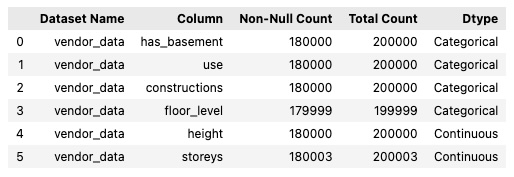
Example EDA job: check the summary statistics for the vendor data. Summary statistics are only provided for numerical variables
provider_data1_individual_eda.describe().T
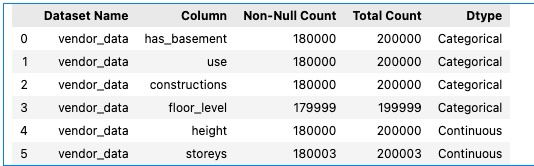
provider_data1_individual_eda.describe(categorical=True).T

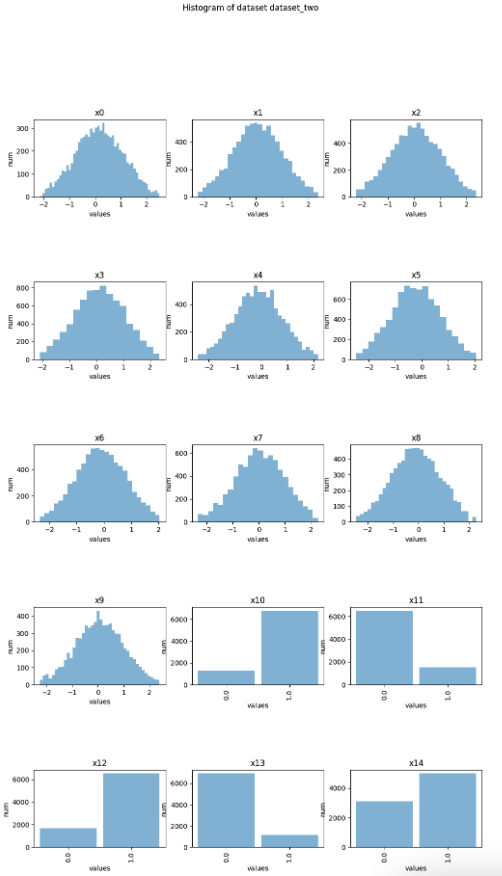
Histograms
You can create histogram plots using the .plot_hist() function.
hist = provider_data1_individual_eda.plot_hist()
provider_data1_individual_eda.col_names
Output: ['has_basement', 'use', 'constructions', 'floor_level', 'height', 'storeys']
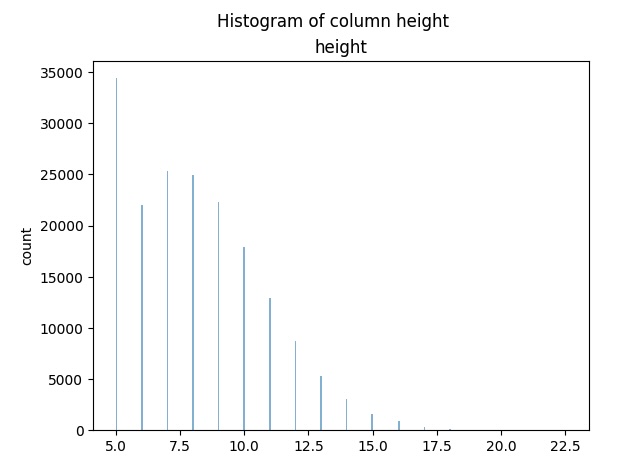
Example EDA job: Display the results in a single histogram
col = 'height' # fill-in here the name of column that will be examed

single_hist = provider_data1_individual_eda[col].plot_hist()
Statistics
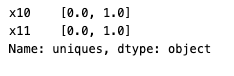
For categorical columns, you can use other statistics for further exploration. For example, unique_count, mode, and uniques.
results["dataset_one"][["x10", "x11"]].uniques()
You can call functions such as .mean(), .median(), and .std() individually.
results["dataset_one"].mean()
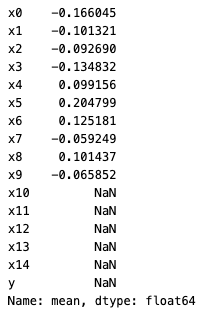
results["dataset_one"]["x1"].mean()

Back to Data Analysis Overview